Creating meter based PMs
Asset Essentials allows you to generate new preventive maintenance (PM) work orders based on meter readings for an Asset.
Watch the video tutorial:

How to create a meter based PM
- Click on the Work Orders menu icon, then click PM/PdM.
- Click the New button.
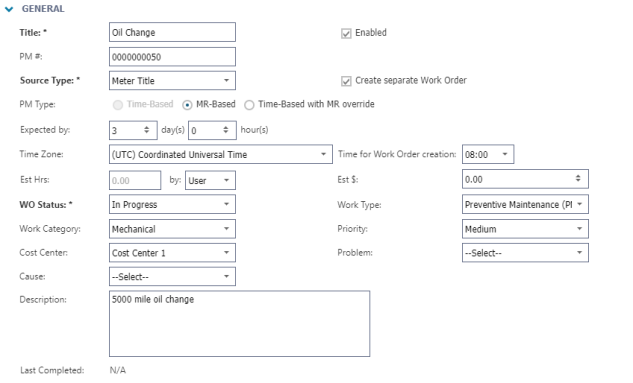
General
- Enter a Title.
- If this PM schedule should be active and ready to generate Work Orders upon saving, make sure the box next to Enabled is checked.
- Select Meter Title in the Source Type drop down menu.
- Select MR-Based for the PM work order to generate based only on the results of a meter reading.
- Select Time-Based with MR Override to setup a Schedule Based PM which allows for a certain meter reading threshold to override the schedule. *Note: If you select this option, you will need to set up a schedule frequency as well as select your meter title.
- Select the Expected by day(s) and hour(s) to determine the amount of time it will take for the PM work order to be completed, starting from the Assigned date and time.
- The rest of the fields in the General section are optional, however it is recommended to provide as much detail as possible.
Meter titles
*Note: In order for PM work orders to generate accurately based on the asset's meter readings, you should only select one meter title in this section.
- Click the plus sign icon (
) to open the Select Meter Title window.
- Click the gear icon (
) to select the Asset.
- Select the Meter Title from the drop down menu.
- Select from one of the following options:
- Threshold - This option means a Work Order will generate when it either falls below the Min Threshold or rises above the Max Threshold.
- Running Total - This option means a Work Order will generate if the difference between the current meter reading and the meter reading from the last service is out of the entered range.
- Click on the meter icon (
) to select the Meter reading from last service. You can update the PM trigger on an as-needed basis from a created PM work order.
- Enter the Difference Max. For example, enter "5000" here if you would like oil changes to be done every 5,000 miles.
- Accumulated Readings - This option means a Work Order will generate if the total of all meter readings for the Asset exceeds the value you enter. If you track the number of runtime hours an air handling unit runs per day then you can report on the average reading over time.
- Click on the meter icon (
) to select the Last MR date that triggered WO. You can update the PM trigger on an as-needed basis from the PM work order.
- Enter the Total Max. For example, enter 420 here if an air handling unit needs work done after a certain number of runtime hours are met.
Exclusion conditions
You can use this section to apply PM Exclusion Conditions created at the account level or the site level in order to halt PM work order generation for a specific amount of time. *Note: This section will only appear if you are creating a "Time-Based with MR Override" PM.
- To apply all active site level PM Exclusion Conditions, check the Apply site level exclusions box. A grid will display including all active PM Exclusion Conditions that will be applied to this PM. *Note: If the PM has multiple sites, then this option will be disabled.

- To apply specific PM Exclusion Conditions to the PM, check the Apply PM level exclusions box.
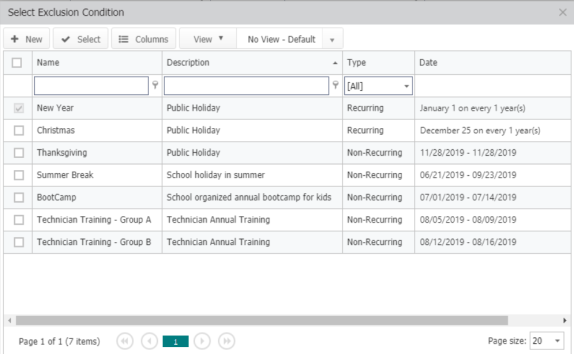
- Click the Select Exclusion Condition icon (
).
- Check the box next to the PM Exclusion Condition(s) you would like to apply to this PM.
- Click Select at the top of the window.
- Click Save at the top of the page.
- Click OK in the confirmation window that appears to finalize your changes.
- Choose from the following two options in the To generate WO section:
- on next scheduled date (skip this cycle): The next PM work order generation will take place on the next scheduled cycle after the PM Exclusion Condition date has passed.
- on next work day: The next PM work order generation will take place on the next day, including weekends, that does not include any exclusions.
- Click Save at the top of the page.
Work requested
The Work requested section provides a way to enter a description of the work to be performed. In general, this description is an overview of the work, and does not replace the Tasks/Steps section of the PM.
Assigned to
Use this section to indicate who is responsible for the PM work.
- Click the Select User (
) or Select Me (
) icons to either select yourself or another user whose information is already populated in Asset Essentials.
Parts
The Parts section of a PM schedule enables you to allocate or assign parts to a PM. Those parts will appear on each work order that the PM schedule generates. This creates a link between parts assigned in the PM and the inventory held by the organization.
- Click on the Select Part icon (
).
- Choose the Part(s) from the Select Part window.
- Enter the Quantity needed for the PM.
- Select a Usage Type.
- Dispatch: This option will subtract the Quantity listed from the current Quantity Available for the part when a work order is generated.
- Reserve: This option will mark the Quantity listed as Reserved Quantity for the part when a work order is generated.
- Order: This option will create a parts transaction for parts that need to be ordered when a work order is generated.
- Select a Usage Option.
- Manual: This option does not automatically add parts to the work order when it is generated. Any parts needed for the work order will need to be manually added.
- First Available: This option adds parts to the work order from the first available location.
- Preferred Order: This option adds parts to the work order from the preferred location.
- Enter a description of the part, if needed.

Equipment
An asset needed to complete PM work is defined as a piece of equipment and can be added to the PM schedule as an equipment item. For example, if you need to use a Shop-Vac to complete the PM work, you can select the Shop-Vac asset in this section to indicate it will be used to on the job. If you are performing maintenance on the Shop-Vac, then it would be selected as an Asset on the PM Schedule and not in this section.
- To select a piece of Equipment, click the Select Asset icon (
).
- In the Select Asset window, check the box next to the Asset(s) you will be using as Equipment, and click the Select button.
- Select the User who will be using the Equipment to complete this PM work.
- If the Equipment has an Equipment Rate, select it from the drop down.
- If you are utilizing the Calendar features of Asset Essentials, enter a Start Time and End Time so other staff members can view when the Equipment will be in use.

Tasks/Steps
Asset Essentials allows you to create a list of tasks for the worker to follow. You have the option to either create a new task by clicking the Add New Task button or you can select a existing task from the Tasks Library. *Note: If you are adding a task to a new PM or work order, you must first save the PM or work order before any tasks can be added.
Task types
There are 3 task types to choose from when creating tasks on your PMs:
Instruction - use this task type for generic step-by-step tasks
Collect Reading - use this task type if the worker should record any meter readings from an asset. *Note: If you select Collect Reading, you must also select an Asset and a Meter Title.
Pass/Fail - use this task type for inspection-like tasks that require a determination that an asset passed a review, failed a review, or failed the review but was able to be fixed. *Note: If you select Pass/Fail, you must also select an Asset.
Adding a task from the tasks library
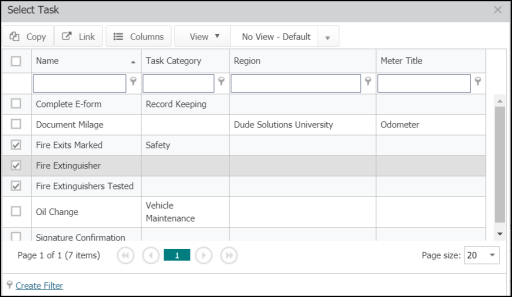
- Click on Select from library, then click Select Task.
- Check the box next to any task you would like included on the work order.
- Click the Copy or Link button to transfer the tasks to the PM schedule.
- Copy: The Copy button will allow you to make edits to the tasks on the individual PM without altering the original task stored in the library.
- Link: The Link button will gray out the tasks on the individual PM and not allow you to make edits. In order to make edits using the Link button the tasks must be edited directly from the task library and will affect all other PMs that have those tasks linked.
Adding a task book from the tasks library
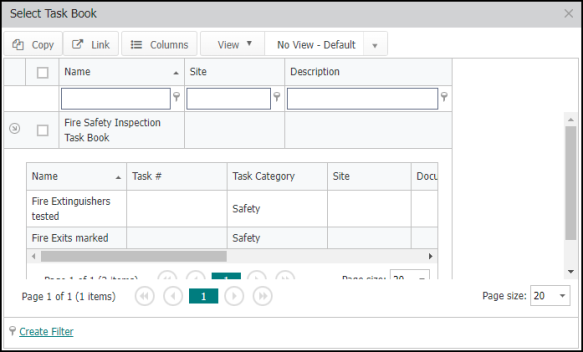
- Click on Select from library, then click Select Task Book.
- Check the box next to each task book you would like to add to the PM and click the Copy or Link button. *Note: If you need to preview the tasks included, click the arrow icon (
) next to the task book.
- Copy: The Copy button will allow you to make a copy of all the tasks in the task book onto the individual PM. Once copied, the tasks are no longer associated with the task book and can be edited without altering the original tasks stored in the library.
- Link: The Link button will gray out the tasks on the individual PM and not allow you to make edits. In order to make edits using the Link button, the tasks must be edited directly from the task library and will affect all other PMs that have those tasks linked.
- The tasks will now appear on the PM. *Note: When a work order generates from the PM the Task Book name will not be displayed on the work order but the tasks within the Task Book will still be listed in the correct order.
Adding a single task
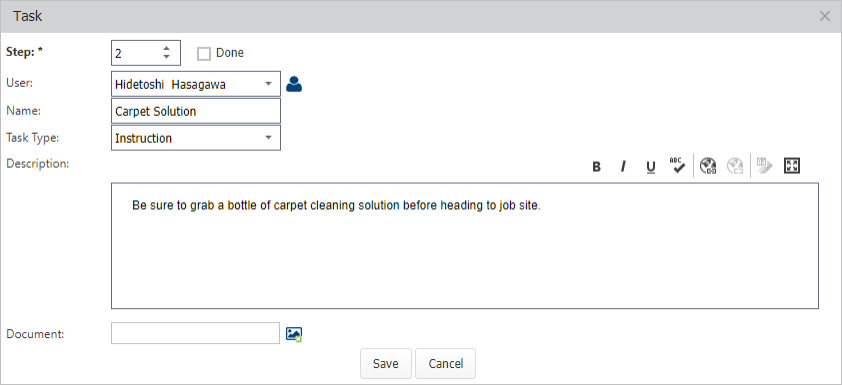
- Click on Add New Task to create a new task on the work order.
- In the Task window, select the User responsible for the task from the drop down menu or click the user icon (
) to select a user from the list.
- Enter the Name of the task as well as the Description.
- Select the Task Type.
- Instruction - generic step-by-step tasks
- Collect Reading - when meter readings need to be recorded for an asset. *Note: You must also select an Asset and a Meter Title with this task type.
- Pass/Fail - for inspection-like tasks that require a determination that an asset passed a review, failed a review, or failed the review but was able to be fixed. *Note: You must also select an Asset with this task type.
- Enter a Description for the task.
- If you need to attach a document to the task, click the image icon and select a document from either your Document Library or upload a file from your computer.
- Repeat these steps to add as many tasks as needed.
Documents
Use this section to attach documents related to your PM schedule.
- Click on the Select Document icon to either select a document from the Documents Library, or add a document from your computer.
Custom fields for work order
If your account is using custom fields, fill out any information in this section.
- Once you have completed all of the required fields, click the Save button at the top of the page.
